

In this article i will show you how to install phpmyadmin on Ubuntu 22.04.
Update your APT Package
sudo apt updateInstall Phpmyadmin
sudo apt install phpmyadmin php-mbstring php-zip php-gd php-json php-curlNote: You have installed MYSQL by following the above command, Now you have to enable the password plugin validation. As of this writing, while enabling this component an error will be triggered as i shown the screenshot below.
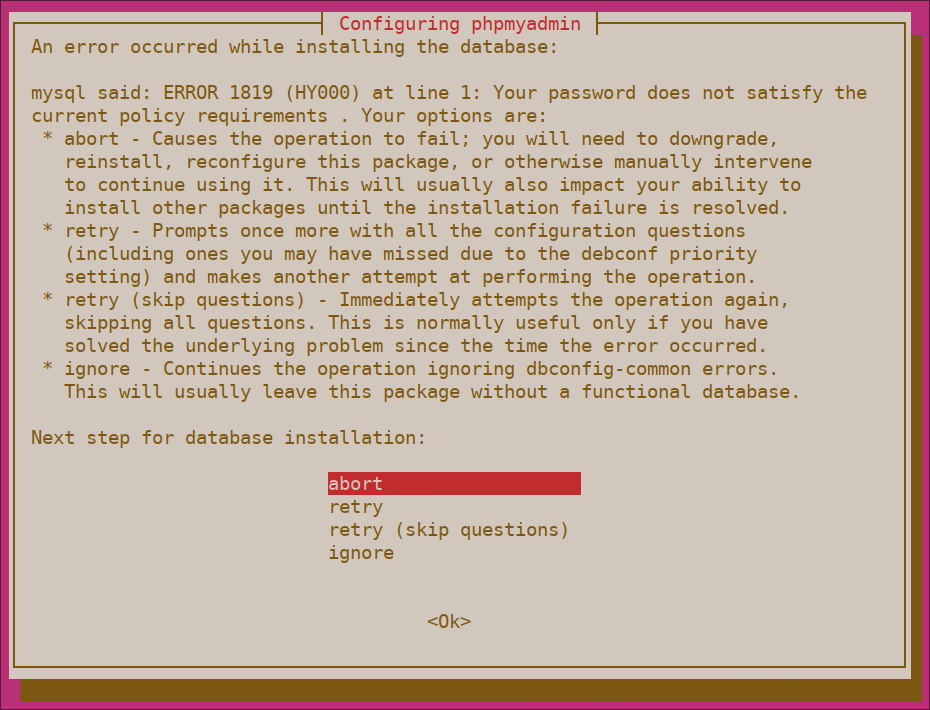
To overcome the above issue, select the abort option to stop the installation process.
Open you MYSQL promt in terminal by running the below command
sudo mysqlOr, if you enabled password authentication for the root MySQL user, run this command and then enter your password when prompted
mysql -u root -pFrom the prompt, run the following command to disable the Password Validate component. Note that this won’t actually uninstall it, but just stop the component from being loaded on your MySQL server
UNINSTALL COMPONENT "file://component_validate_password";Following that, you can close the MySQL client
exitRe-install the phpmyadmin package again and it will work as expected
sudo apt install phpmyadminOnce phpMyAdmin is installed, you can open the MySQL prompt once again with sudo mysql or mysql -u root -p and then run the following command to re-enable the Password Validate component
INSTALL COMPONENT "file://component_validate_password";The installation process adds the phpMyAdmin Apache configuration file into the /etc/apache2/conf-enabled/ directory, where it is read automatically. To finish configuring Apache and PHP to work with phpMyAdmin, the only remaining task in this section of the tutorial is to is explicitly enable the mbstring PHP extension, which you can do by typing
sudo phpenmod mbstringAfterwards, restart Apache for your changes to be recognized
sudo systemctl restart apache2Adjusting User Authentication and Privileges
Open you MYSQL promt in terminal by running the below command
sudo mysqlNext, check which authentication method each of your MySQL user accounts use with the following command
SELECT user,authentication_string,plugin,host FROM mysql.user;To configure the root account to authenticate with a password, run the following ALTER USER command. Be sure to change password to a strong password of your choosing
ALTER USER 'root'@'localhost' IDENTIFIED WITH caching_sha2_password BY 'password';Note: The previous ALTER USER statement sets the root MYSQL user to authenticate with the caching_sha2_password. However, some versions of PHP don’t work properly with caching_sha2_password to overcome that issue run the below statement.
ALTER USER 'root'@'localhost' IDENTIFIED WITH mysql_native_password BY 'password';Then, check the authentication methods employed by each of your users again to confirm that root no longer authenticates using the auth_socket plugin
SELECT user,authentication_string,plugin,host FROM mysql.user;Configuring Password Access for a Dedicated MySQL User
Alternatively, some may find that it better suits their workflow to connect to phpMyAdmin with a dedicated user. To do this, open up the MySQL shell once again
sudo mysqlIf you have password authentication enabled for your root user, as described in the previous section, you will need to run the following command and enter your password when prompted in order to connect
mysql -u root -pFrom there, create a new user and give it a strong password
CREATE USER 'linuxquery'@'localhost' IDENTIFIED WITH caching_sha2_password BY 'password';Note: Again, depending on what version of PHP you have installed, you may want to set your new user to authenticate with mysql_native_password instead of caching_sha2_password
ALTER USER 'linuxquery'@'localhost' IDENTIFIED WITH mysql_native_password BY 'password';Then, grant your new user appropriate privileges. For example, you could grant the user privileges to all tables within the database, as well as the power to add, change, and remove user privileges, with this command
GRANT ALL PRIVILEGES ON *.* TO 'linuxquery'@'localhost' WITH GRANT OPTION;Following that, exit the MySQL shell
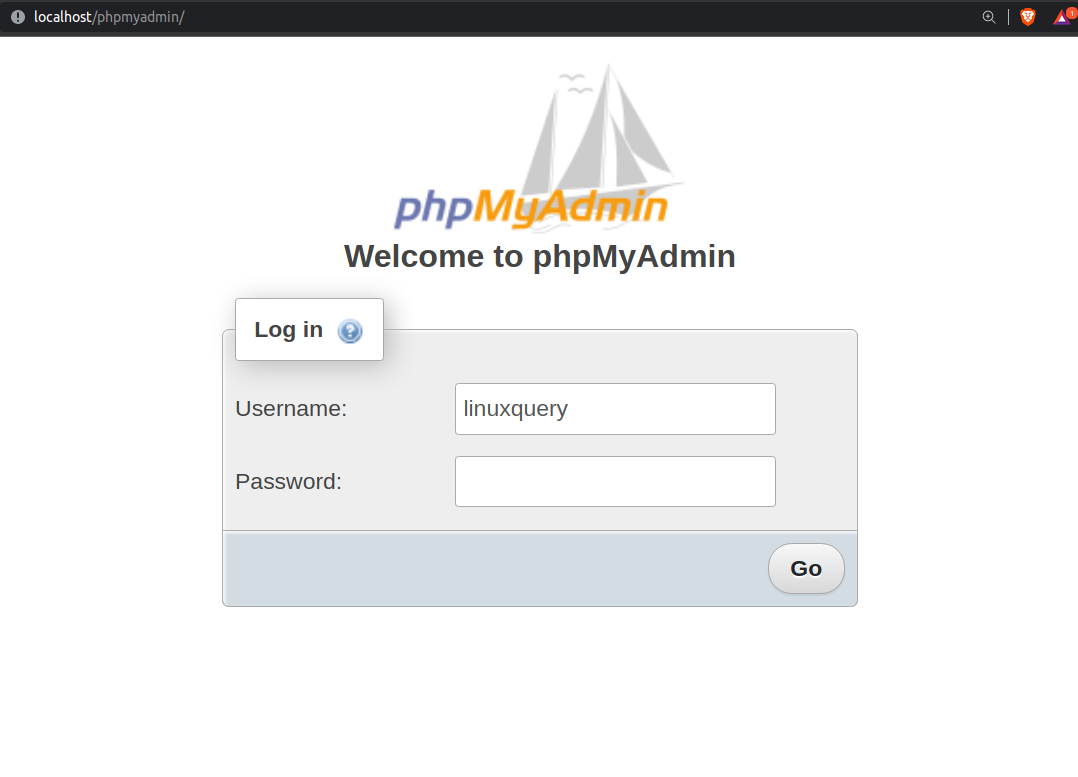
exitYou can now access the web interface by visiting your server’s domain name or public IP address followed by /phpmyadmin example: https://your_domain_or_IP/phpmyadmin